Hugo 是由 Go 语言实现的静态网站生成器,可以快速建立一个静态网站,虽然多数情况下用来搭建个人博客,但也可以用作展示在线书籍、个人简历等。在使用 Hugo 之前,我一直使用 Hexo 搭建个人博客,促使我更换工具的原因主要有两个
文章数量较多时,Hexo 生成速度非常慢,同样的文章数量下,Hugo 渲染文章几乎是即时的; Hexo 依赖于 Node.js,使用需要在电脑里安装 node 和 npm。另外,Hexo 允许开发者提供各种 npm 模块来增强其功能,这种做法虽然使 Hexo 扩展性极高,但在博客的维护、备份和恢复等方面都带来了极大的不便。Hugo 使用 Go 开发,不依赖任何其它模块,只需要按照 Hugo 这一个软件即可。 综上,我选择将博客网站迁移到 Hugo,这个系列的文章用来记录 Hugo 使用种遇到的问题和积累的经验。本文是第一篇,介绍博客网站搭建的过程和一些基础配置。
1. 安装Hugo 详细的安装说明参见官方文档 ,这里简单介绍 win10 和 Ubuntu18.04 的快速安装。
win10下可自行从官网下载软件包安装,也可以使用 chocolatey 包管理工具快速安装
 1
 2
 3
 4
 5
 6
 7
 8
 9
10
11
# 更新chocolatey到最新
> choco upgrade chocolatey

# 安装hugo-extended,因为将要使用的主题使用scss
> choco install hugo-extended -y

# 检查安装
> choco list --local
chocolatey 0.10.15
hugo-extended 0.58.3
2 packages installed.
Ubuntu下使用 apt-get 会安装低版本 Hugo,因此使用 snap 安装
1
2
$ snap install hugo --channel= extended
hugo ( extended/stable) 0.58.3 from Hugo Authors installed
注意要安装 extended 版本,主要是因为很多主题都需要扩展版的功能,如果确认自己的主题不需要(阅读主题说明),可以按照正常的版本。
2. 生成博客网站 执行下面的命令在本地生成博客网站项目文件夹,该文件夹是这一系列文章之后所有操作执行的根目录(简称为项目根目录),我建立的项目文件夹名为 shuzang.github.io (因为之后要使用 Github Pages 托管博客)。
1
2
$ hugo new site shuzang.github.io
$ cd shuzang.github.io
blog 文件夹的目录结构如下所示,其中各文件夹的作用我们将在之后的使用过程中逐步了解
1
2
$ ls
archetypes/  config.toml  content/  data/  layouts/  static/  themes/
3. 托管到Github 将本地的项目文件夹初始化为 Github 仓库
1
2
3
$ git init
$ git add .
$ git commit - m "Initial commit"
浏览器打开 Github 网站,创建和项目文件夹同名的仓库,该仓库用于存储项目文件夹下所有内容。创建完成后,在本地项目根目录,执行下列命令,将项目文件推送到远程仓库。
1
2
$ git remote add origin https://github.com/shuzang/shuzang.github.io.git
$ git push -u origin master
关于网页如何托管在Github的详细说明可以参考Host on Github
3.1 源码备份 按照 Hugo 的生成规则,执行 hugo 命令后,网站静态文件将会生成在 public 文件夹。但由于我们使用 Github Pages 托管博客网站,该功能启用后 Github 仓库只会从 master branch 或 master branch /docs folder 读取网站源码。
我们解决这一问题的方法是新建 blog 分支将博客源码放在该分支下,利用 Github Action 将 public 目录下的网站文件推送到 master 分支。首先在本地项目根目录下执行下列命令新建并切换到 blog 分支
注:Github Action 的说明见附录I
 1
 2
 3
 4
 5
 6
 7
 8
 9
10
$ git checkout -b blog
$ git branch
* blog
master
# 设置本地blog分支追踪远程blog分支
$ git branch --set-upstream blog origin/blog
# 查看分支跟踪关系
$ git branch -vv
* blog c63526c [ origin/blog] Update posts
将本地 blog 分支的内容推送到远程仓库后,在网页端进入shuzang.github.io仓库的设置页面,将默认分支设置为 blog 分支。
设置默认分支
3.2 推送到master分支 首先生成公私钥供 Github Action 使用
1
2
3
4
ssh-keygen -t rsa -b 4096 -C " $( git config user.email) " -f blog -N ""
# You will get 2 files in current file:
# blog.pub (public key)
# blog (private key)
然后进入 shuzang.github.io 仓库设置页面,在 Deploy Keys 中添加公钥,在 Secrets 中添加私钥,私钥名设置为 ACTIONS_DEPLOY_KEY
接着新建 YAML 配置文件,Github Action 要求配置文件位于 .github/workflows 目录下,新建完成后目录结构如下
1
2
$ ls ./.github/workflows
main.yml
Github Action使用一种模块化的思路,即将很多持续集成的操作写成独立的脚本文件,放到代码仓库,让其它开发者使用。因此进行持续集成时,可以直接引用别人写好的 action,整个持续集成的过程,就是一个 actions 组合的过程。GitHub 做了一个官方市场 ,可以搜索到他人提交的 actions。另外,还有一个 awesome actions 的仓库,也可以找到不少 action。
我们的基本思路如下
整个流程在 blog 分支 push 时触发 只有一个job,运行在ubuntu-18.04环境下 使用 official action: checkout 获取仓库源码,注意添加参数clone主题子模块 使用 peaceiris/actions-hugo: GitHub Actions for Hugo 部署 hugo 环境,注意使用 extentded 版本(主题要求) 直接执行 hugo 命令 使用 peaceiris/actions-gh-pages 将当前分支public目录下的内容部署到master分支, 完整的main.yml脚本内容如下
 1
 2
 3
 4
 5
 6
 7
 8
 9
10
11
12
13
14
15
16
17
18
19
20
21
22
23
24
25
26
27
28
29
30
name : hugo push to github pages
on :
push :
branches :
- blog
jobs :
build-deploy :
runs-on : ubuntu-18.04
steps :
- uses : actions/checkout@v1
with :
submodules : true
- name : Setup Hugo
uses : peaceiris/actions-hugo@v2
with :
hugo-version : '0.59.1'
extended : true
- name : Build
run : hugo --minify
- name : Deploy
uses : peaceiris/actions-gh-pages@v2
env :
ACTIONS_DEPLOY_KEY : ${{ secrets.ACTIONS_DEPLOY_KEY }}
PUBLISH_BRANCH : master
PUBLISH_DIR : ./public
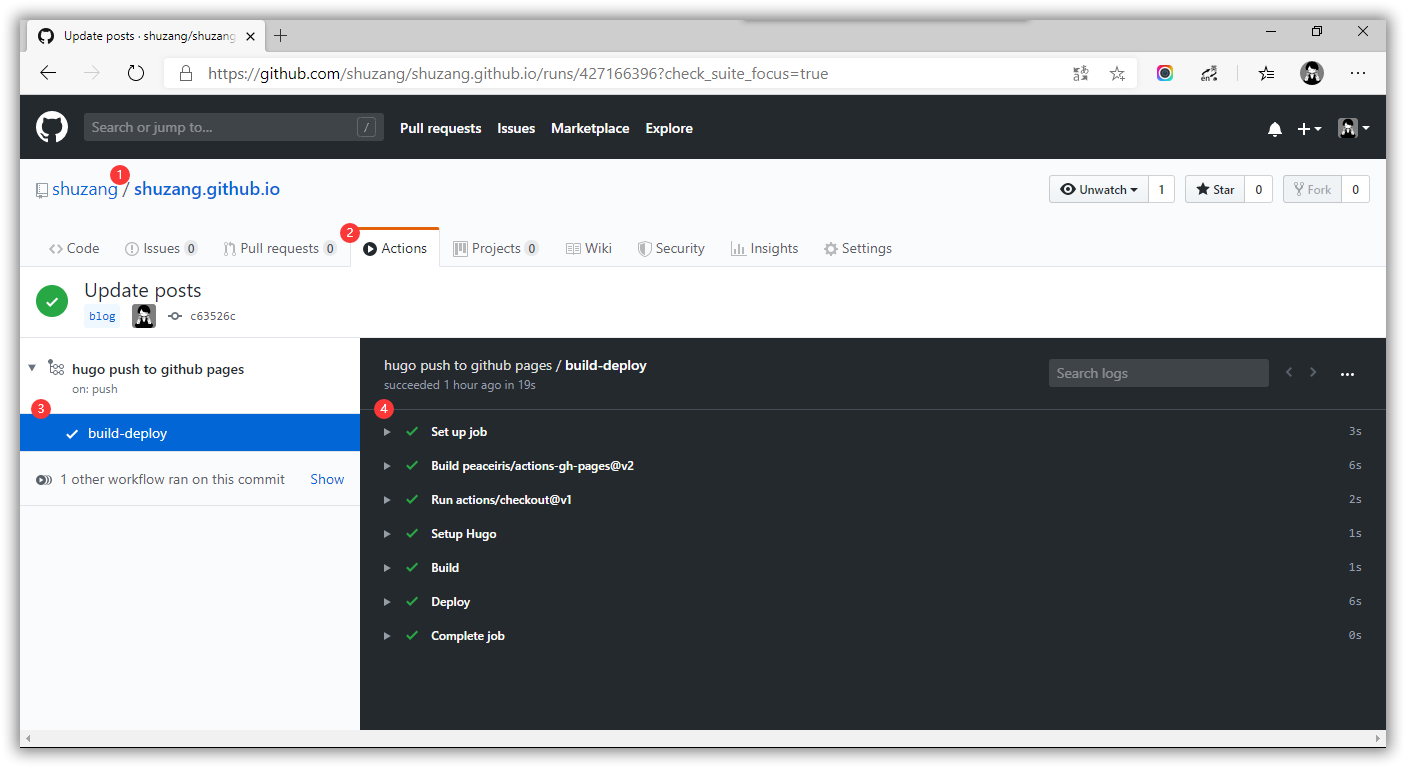
保存上面的文件后,将本地仓库推送到远程,Github 检测到 .github/workflow 目录和里面的main.yml 文件,就会自动运行,在网页端可以查看运行日志,如果出现错误可以根据日志内容就行修改。
Github Action 日志文件
等到workflow运行结束,访问博客页面,就可以看到更新成功了。切换到master分支,也可以看到推送的网页文件,不过因为设置了默认分支为 blog,以后打开网页端该仓库,以及在本地 clone的时候,默认都是 blog 分支。
注:Github Action 在2020年开始正式使用,之前一直使用 Travis CI,配置步骤见 附录II
4. 安装主题 Hugo没有默认主题,需要自己从官方的主题列表 下载安装。总体来看,Hugo 主题的数量和质量可能都不如 Hexo,比如 Next 这种主题已经形成了庞大的开发社区,有大量的人在使用和维护,Hugo 中就没有这种影响力很大的主题了,但 Hugo 的主题的创意都非常棒。
KeepIt 是其中一个较为简单优雅的主题,基于 LeaveIt 主题二次开发而成,遵循「Less is more」的原则,是我最喜欢的主题。因为主题通常是单独的 Github 仓库,因此将其作为博客项目的子模块进行管理。
1
2
3
4
5
# 将主题项目作为子模块添加
$ git submodule add https://github.com/Fastbyte01/KeepIt.git themes/KeepIt
# 查看子模块信息
$ git submodule
87c33888f3fa86b8cc096bc3f6d7f2efe9ccba66 themes/KeepIt ( v4-53-g87c3388)
复制主题提供的站点配置文件 config.toml 到项目根目录,覆盖 Hugo 本身的站点配置文件(第一次使用可以将exampleSite目录下的内容全部复制过来)
1
$ cp themes/KeepIt/exampleSite/. .
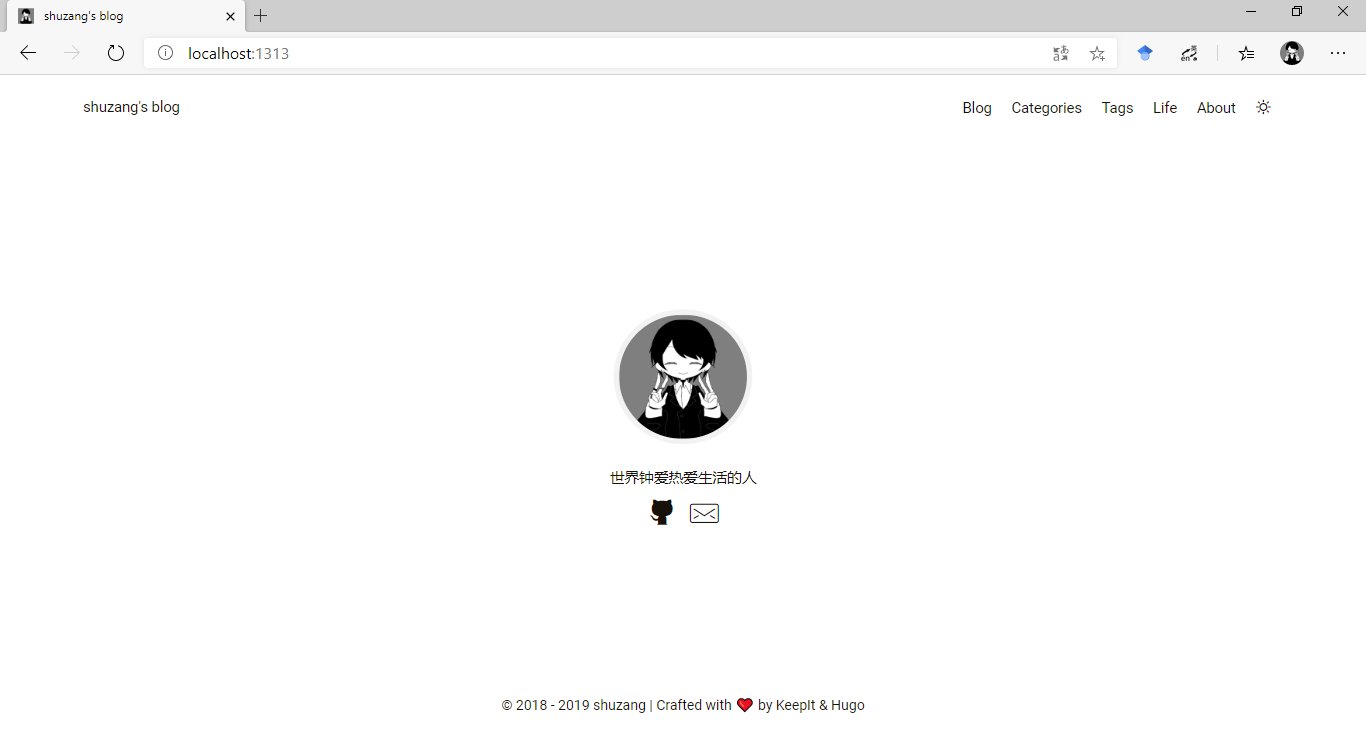
运行hugo server命令,在浏览器键入网址 http://localhost:1313 预览主题效果(首页图片未加载是因为还没有放置头像文件)
KeepIt theme preview
5. 网站配置 正式使用前,我们需要编辑站点配置文件从而设置网站的一些内容,通常配置文件或主题文档会进行详细的说明,当前我们对 config.toml 文件做如下配置
5.1 基础配置 1
2
3
4
5
6
7
8
9
10
11
12
13
14
15
16
17
18
19
20
21
22
23
24
25
26
27
28
29
30
31
32
33
34
35
36
37
38
39
40
baseURL = "https://shuzang.github.io"
languageCode = "en"
defaultContentLanguage = "en"
title = "Shuzang's blog"
theme = "KeepIt"
paginate = 12
enableEmoji = true
enableRobotsTXT = true
googleAnalytics = ""
disqusShortname = "yourdiscussshortname"
[ sitemap ]
changefreq = "monthly"
filename = "sitemap.xml"
priority = 0.5
[ blackfriday ]
hrefTargetBlank = true
nofollowLinks = true
noreferrerLinks = true
[ Permalinks ]
posts = "/:year/:filename/"
[ menu ]
[ [ menu . main ] ]
name = "Blog"
url = "/posts/"
weight = 1
[ [ menu . main ] ]
name = "Categories"
url = "/categories/"
weight = 3
[ [ menu . main ] ]
name = "About"
url = "/about"
weight = 4
5.2 头像 新建static/images文件夹,将头像文件存放在这里
1
2
3
4
5
6
7
8
9
10
$ mkdir static/images
# 复制头像文件到images文件夹,复制完成后目录结构如下
$ ls staitc -lR
static:
total 0
drwxr-xr-x 1 书藏 197610 0 11月 17 14:41 images/
static/images:
total 88
-rw-r--r-- 1 书藏 197610 87641 9月 28 18:21 avatar.png
修改站点配置文件params部分的avatar字段值
1
2
[ params ]
avatar = "images/avatar.png" #comment it to use gravatar
也可以使用自己图床中的头像图片链接,或者如果有gravatar头像,可以在配置文件中寻找相关字段填写账号。
5.3 首页社交链接 修改站点配置文件中params.social部分的内容,需要的社交链接取消注释即可启用,比如我只启用了Github和Email,Github只需要填用户名,完整的URL在主题源码中自动生成。
1
2
3
[ params . social ]
GitHub = "/shuzang"
Email = "xxxxx@qq.com"
5.4 网站基本资料 编辑站点配置文件的以下内容
1
2
3
4
5
6
7
8
9
title = "shuzang's blog" # 网站标题
[ params ]
since = 2018 # 站点建立时间
author = "shuzang" # 作者名
subtitle = "世界钟爱热爱生活的人" # 子标题
home_mode = "" # post or other # post模式会在主页面显示文章
description = "shuzang的个人博客" # 网站描述
keywords = "blog, Golang, Hugo, blockchain " # 网站关键词
5.5 网站图标 使用 favicon generator 生成配套的网站图标,放到 /static 目录下,可以设置网站在各平台的显示图标,包括如下内容
android-chrome-192x192.png android-chrome-512x512.png apple-touch-icon.png browserconfig.xml cover.png favicon.ico favicon-16x16.png favicon-32x32.png logo.png mstile-150x150.png safari-pinned-tab.svg site.webmanifest 然后修改站点配置文件中以下内容
1
2
3
4
5
6
7
8
9
10
11
12
13
14
15
16
17
18
19
20
[ author ]
name = "shuzang"
[ params . publisher ]
name = "shuzang"
[ params . publisher . logo ]
url = "logo.png"
width = 127
height = 40
[ params . logo ]
url = "logo.png"
width = 127
height = 40
[ params . image ]
url = "cover.png"
width = 800
height = 600
更多配置可以参考Mogeko的个人博客
以上所有配置完成后,博客网站首页如下
configuration finished
5. 文章发布 在content目录下创建 posts文件夹,写作的文章全部放到该目录下,在每篇文章开头添加元数据字段,可以是YAML或TOML格式,示例如下
1
2
3
4
5
6
7
8
9
10
11
12
13
14
15
16
17
title = "Getting Started with Hugo"
description = ""
type = [ "posts" , "post" ]
tags = [
"go" ,
"golang" ,
"hugo" ,
"development" ,
]
date = "2014-04-02"
categories = [
"Development" ,
"golang" ,
]
series = [ "Hugo 101" ]
[ author ]
name = "Hugo Authors"
下面是一篇示例文章
1
2
3
4
5
6
7
8
9
10
11
12
13
---
title: Markdown说明
date: 2020-04-05
tags: ["Markdown"]
categories: ["爱编程爱技术的孩子"]
---
Markdown由Aaron Swartz和John Gruber共同设计
- Aaron Swartz的博客:[http://www.aaronsw.com/](http://www.aaronsw.com/)
- John Gruber的博客: [https://daringfireball.net/ ](https://daringfireball.net/ )
作者中的Aaron Swartz是天才程序员,著名社交网站[Reddit](http://www.reddit.com/)的联合创始人,14岁参与RSS 1.0规格标准的制订,致力于网络信息开放。在2011年7月19日,因被指控从MIT和JSTOR下载480万篇学术论文并以免费形式上传于网络被捕,2013年1月自杀身亡,年仅26岁。
文章保持后将仓库新增内容推送到远程,几分钟后即可在 https://shuzang.github.io 看的这篇文章
示例文章
6. 主题迁移 随着使用时间的增加,逐渐意识到某些功能的必不可少,比如目录、数学公式支持等。KeepIt 主题已经停止了更新,好在在KeepIt的基础上重构设计的 LoveIt 主题,解决了大部分我关心的问题。这里借此介绍如何更换主题。
首先删除原来的主题子模块
1
2
$ git submodule deinit themes/LoveIt
$ git rm themes/LoveIt
然后添加新的主题作为子模块并重新配置 config.toml 文件
1
$ git submodule add https://github.com/dillonzq/LoveIt.git themes/LoveIt
具体的配置可以参考主题文档,一个参考配置如下
 1
 2
 3
 4
 5
 6
 7
 8
 9
10
11
12
13
14
15
16
17
18
19
20
21
22
23
24
25
26
27
28
29
30
31
32
33
34
35
36
37
38
39
40
41
42
43
44
45
46
47
48
49
50
51
52
53
54
55
56
57
58
59
60
title = "Shuzang's Blog" # 设置网站标题
theme = "LoveIt" # 设置主题为LoveIt
hasCJKLanguage = true # 启用对中文统计的支持,不启用字数统计会出问题
paginate = 10 # 每页的文章数量设置为10,便于根据页数快速计算总文章数
# 作者名设置
[ author ]
name = "shuzang"
# 菜单栏新添life页面并调整顺序
[ menu ]
[ [ menu . main ] ]
identifier = "posts"
name = "Posts"
url = "posts"
weight = 1
[ [ menu . main ] ]
identifier = "categories"
name = "Categories"
url = "categories"
weight = 2
[ [ menu . main ] ]
identifier = "tags"
name = "Tags"
url = "tags"
weight = 3
[ [ menu . main ] ]
identifier = "life"
name = "Life"
url = "life"
weight = 4
[ [ menu . main ] ]
identifier = "about"
name = "About"
url = "about"
weight = 5
# 基本参数设置,包括网站描述字段、关键词、主页文章显示模式、子标题
[ params ]
description = "shuzang's personal blog" # site description
keywords = [ "blog" , "Golang" , "Hugo" , "blockchain" , "go" , "life" ] # site keywords
home_mode = "other" # [post, other] home mode
subtitle = "The world loves people who love life" # subtitle shown in home page
#头像、主页社交链接
[ params . gravatar ]
email = "lylw1996@qq.com"
[ params . social ] # Social Info in home page
GitHub = "shuzang"
Email = "lylw1996@qq.com"
Steam = "76561198343669932"
Skype = "live:844327696"
# gitalk设置涉及clientId和clientSecret,忽略
附录I Github Action GitHub Actions 是 GitHub 在2018年10月推出的一个持续集成服务 ,之前一直是试用阶段,去年(2019年)年末刚刚开放,据说比Travis CI 更简单更好用,所以打算把持续集成工具切换到它。同时,之前博客部署使用了两个仓库,一个放源码,一个放生成的网页文件,目前来看可以统一成一个。本篇文章就打算做这两件事。
Github Actions入门可以阅读官方文档 或者阮一峰大神的GitHub Actions 入门教程
附录II 使用Travis CI 通过Travis CI做博客的持续集成,可以每次自动渲染生成新的博客网页并推送到shuzang.github.io仓库,从而实现调整域名的目的。但之前尝试了多次持续集成都没有成功,还把博客搞坏了,最终只能重建网站。这一次发现了之前存在的问题,终于成功了。
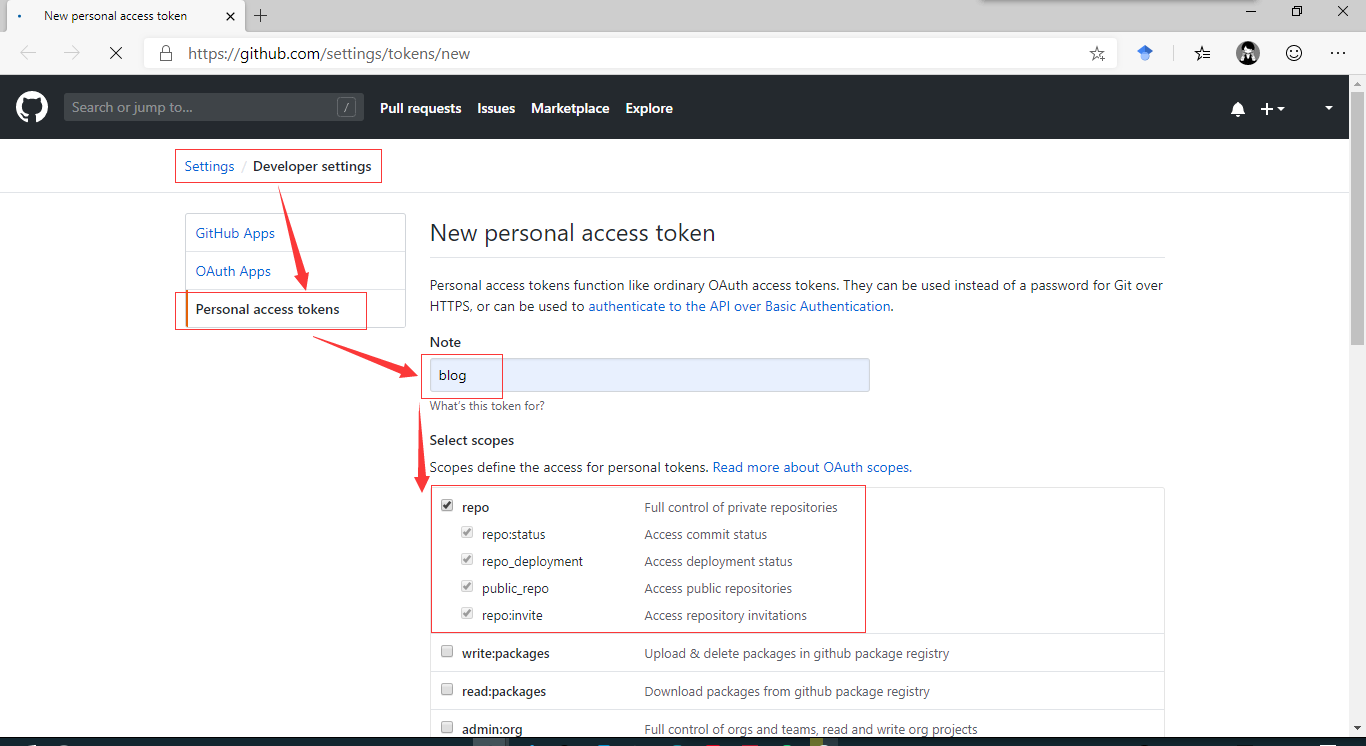
步骤1 申请Token 在GitHub 上申请一个新的 personal access token 。
Token description 随便填,只要之后查看的时候知道是博客的就行。勾选所有 repo 列表项目,其它项目不要选。点击 Generate token 生成Token。
申请Token
之后跳转的页面会显示Token的值,一定要记下来,因为离开这个页面之后这个值就再也无法查看。我因为已经做过一次了,这里就只查看一下。
blog token
步骤2 设置Travis CI Travis CI 是一个持续集成的工具,使用GitHub账号登陆,然后开启 blog 仓库,选择 setting。
开启blog仓库持续集成
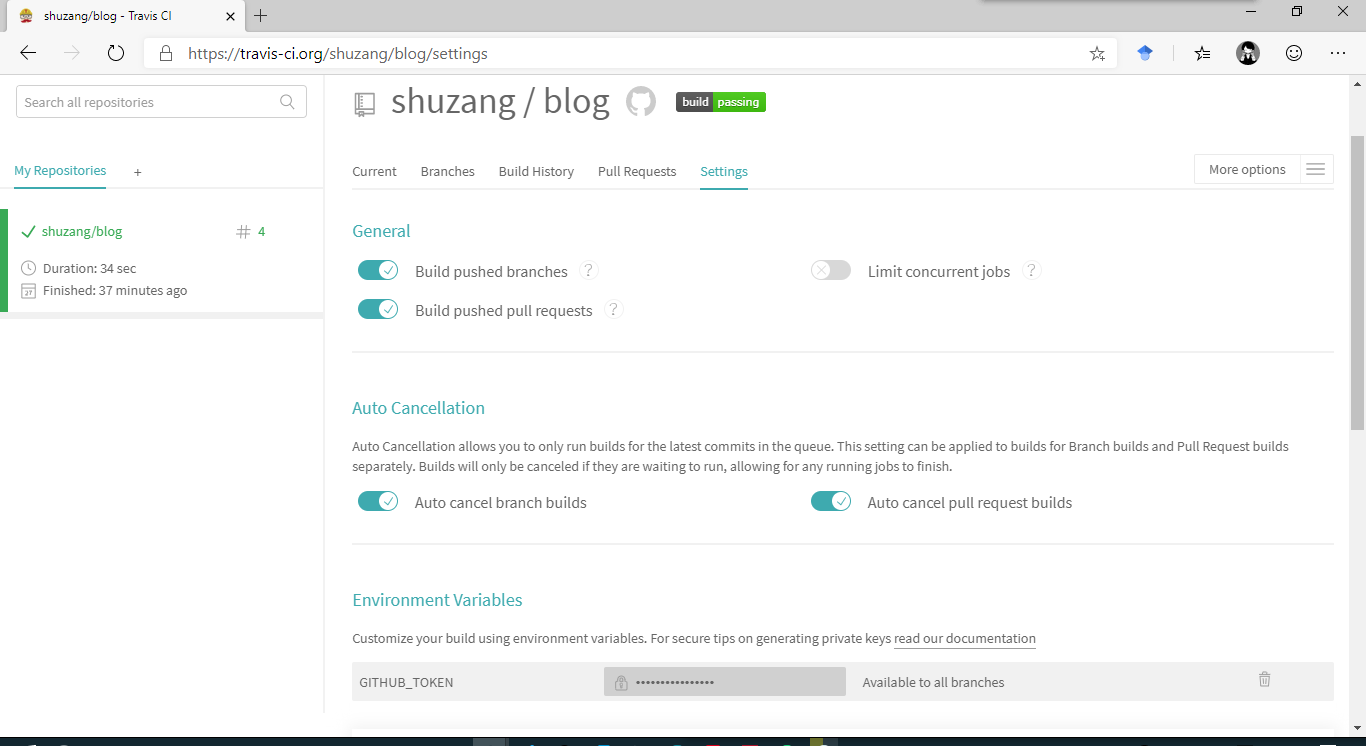
在设置页面填写Environment Variables 。
Name 填写: GITHUB_TOKENValue 填写:刚刚在 GitHub 申请到的 Token 的值填写环境变量
填写完成后点击Add添加
步骤3 编写配置文件 在博客根目录下创建并编辑.travis.yml文件,该文件的作用是告诉Travis CI如何部署博客
 1
 2
 3
 4
 5
 6
 7
 8
 9
10
11
12
13
14
15
$ ls -al blog
total 30
drwxr-xr-x 1 书葬 197610 0 9月 29 20:28 ./
drwxr-xr-x 1 书葬 197610 0 9月 28 18:20 ../
drwxr-xr-x 1 书葬 197610 0 9月 29 20:28 .git/
-rw-r--r-- 1 书葬 197610 101 9月 28 18:21 .gitmodules
-rw-r--r-- 1 书葬 197610 1810 9月 29 20:10 .travis.yml
drwxr-xr-x 1 书葬 197610 0 9月 28 18:21 archetypes/
-rw-r--r-- 1 书葬 197610 4946 9月 29 18:27 config.toml
drwxr-xr-x 1 书葬 197610 0 9月 28 18:24 content/
drwxr-xr-x 1 书葬 197610 0 9月 29 18:56 docs/
-rw-r--r-- 1 书葬 197610 456 9月 29 20:28 README.md
drwxr-xr-x 1 书葬 197610 0 9月 28 18:21 resources/
drwxr-xr-x 1 书葬 197610 0 9月 28 18:21 static/
drwxr-xr-x 1 书葬 197610 0 9月 28 18:21 themes/
文件内容如下
1
2
3
4
5
6
7
8
9
10
11
12
13
14
15
16
17
18
19
20
21
22
23
24
25
26
27
28
29
30
31
32
33
34
35
36
37
38
39
40
41
language : go
go :
- "1.12" # 指定Golang 1.12
dist : bionic # Ubuntu 18.04
env :
global :
# Github Pages
- GH_REF : github.com/shuzang/shuzang.github.io
# Specify which branches to build using a safelist
# 分支白名单限制:只有 master 分支的提交才会触发构建
# branches:
# only:
# - master
before_install :
# 安装依赖
# - wget -q -O libstdc++6.deb http://security.ubuntu.com/ubuntu/pool/main/g/gcc-5/libstdc++6_5.4.0-6ubuntu1~16.04.10_amd64.deb
# - sudo dpkg --force-all -i libstdc++6.deb
# 删除docs文件夹
- rm -rf ./docs
# 安装 hugo (version: v0.58.0)
- wget -q -O hugo.deb https: //github.com/gohugoio/hugo/releases/download/v0.58 .3 /hugo_extended_0.58 .3_Linux-64bit.deb
- sudo dpkg -i hugo.deb
install :
# 运行hugo命令
- hugo
script :
- cd ./docs
- git init
- git config user.name "shuzang"
- git config user.email "lylw1996@qq.com"
- git add .
- git commit -m "Update Blog By TravisCI With Build $TRAVIS_BUILD_NUMBER"
# Github Pages
- git push --force --quiet "https://$GITHUB_TOKEN@${GH_REF}" master: master
大部分都有注释说明,这里要注意的两点是
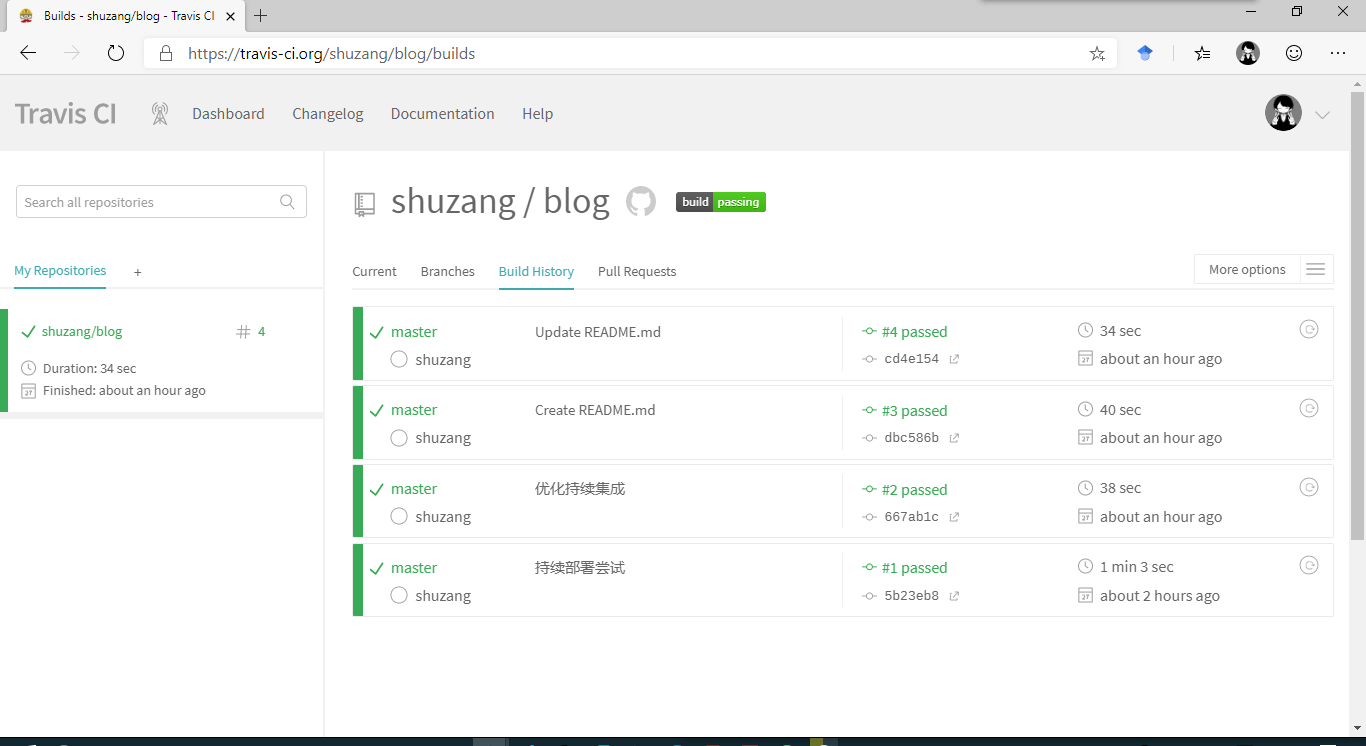
在运行 hugo 命令前要先删除docs文件夹,是为了清除历史网页文件,这是Hugo官方建议的 注释掉了常规 Github pages 进行持续集成时使用的 deploy 部分,因为我们只需要单纯的把网页文件提交到另一个仓库。只有当普通的项目启用github pages时需要这部分,这里的博客部署不需要,开启deploy部分反而会出现错误,目前不知道原因。 步骤4 使用说明 大部分工作都通过Travis CI自动进行了,以后提交只需要在改动之后直接git push到远程仓库,将会触发自动构建,只需要一两分钟,就可以在Travis CI 上查看部署情况。
绿色 代表部署成功 黄色 代表正在部署 红色 代表部署失败 灰色 代表部署被取消
持续集成通过
然后访问博客首页 ,不出意外就可以看到新的改动了。如果部署失败,在网页端的日志记录中找到失败原因,然后修改代码重新提交即可,新的提交通过后,原先失败的提交将会被解决。